PhotoShop算法原理解析系列 - 风格化-搜索边缘。
时间:2022-9-13作者:未知来源:争怎路由网人气:
- ImageLockMode.UserInputBuffer, PixelFormat.Format24bppRgb, BmpData); Stopwatch Sw = new Stopwatch(); // 只获取计算用时 Sw.Start(); for (Y = 0; Y < Height; Y++) { System.Buffer.BlockCopy(ImageData, Stride * Y, ImageDataC, StrideC * (Y + 1), 3); // 填充扩展图的左侧第一列像素(不包括第一个和最后一个点) System.Buffer.BlockCopy(ImageData, Stride * Y + (Width - 1) * 3, ImageDataC, StrideC * (Y + 1) + (Width + 1) * 3, 3); // 填充最右侧那一列的数据 System.Buffer.BlockCopy(ImageData, Stride * Y, ImageDataC, StrideC * (Y + 1) + 3, Width * 3); } System.Buffer.BlockCopy(ImageDataC, StrideC, ImageDataC, 0, StrideC); // 第一行 System.Buffer.BlockCopy(ImageDataC, (HeightC - 2) * StrideC, ImageDataC, (HeightC - 1) * StrideC, StrideC); // 最后一行 for (Y = 0; Y < Height; Y++) { Speed = Y * Stride; SpeedOne = StrideC * Y; for (X = 0; X < Width; X++) { SpeedTwo = SpeedOne + StrideC; // 尽量减少计算 SpeedThree = SpeedTwo + StrideC; // 下面的就是严格的按照Sobel算字进行计算,代码中的*2一般会优化为移位或者两个Add指令的,如果你不放心,当然可以直接改成移位 BlueOne = ImageDataC[SpeedOne] + 2 * ImageDataC[SpeedTwo] + ImageDataC[SpeedThree] - ImageDataC[SpeedOne + 6] - 2 * ImageDataC[SpeedTwo + 6] - ImageDataC[SpeedThree + 6]; GreenOne = ImageDataC[SpeedOne + 1] + 2 * ImageDataC[SpeedTwo + 1] + ImageDataC[SpeedThree + 1] - ImageDataC[SpeedOne + 7] - 2 * ImageDataC[SpeedTwo + 7] - ImageDataC[SpeedThree + 7]; RedOne = ImageDataC[SpeedOne + 2] + 2 * ImageDataC[SpeedTwo + 2] + ImageDataC[SpeedThree + 2] - ImageDataC[SpeedOne + 8] - 2 * ImageDataC[SpeedTwo + 8] - ImageDataC[SpeedThree + 8]; BlueTwo = ImageDataC[SpeedOne] + 2 * ImageDataC[SpeedOne + 3] + ImageDataC[SpeedOne + 6] - ImageDataC[SpeedThree] - 2 * ImageDataC[SpeedThree + 3] - ImageDataC[SpeedThree + 6]; GreenTwo = ImageDataC[SpeedOne + 1] + 2 * ImageDataC[SpeedOne + 4] + ImageDataC[SpeedOne + 7] - ImageDataC[SpeedThree + 1] - 2 * ImageDataC[SpeedThree + 4] - ImageDataC[SpeedThree + 7]; RedTwo = ImageDataC[SpeedOne + 2] + 2 * ImageDataC[SpeedOne + 5] + ImageDataC[SpeedOne + 8] - ImageDataC[SpeedThree + 2] - 2 * ImageDataC[SpeedThree + 5] - ImageDataC[SpeedThree + 8]; PowerBlue = BlueOne * BlueOne + BlueTwo * BlueTwo; PowerGreen = GreenOne * GreenOne + GreenTwo * GreenTwo; PowerRed = RedOne * RedOne + RedTwo * RedTwo; if (PowerBlue > 65025) PowerBlue = 65025; // 处理掉溢出值 if (PowerGreen > 65025) PowerGreen = 65025; if (PowerRed > 65025) PowerRed = 65025; ImageData[Speed] = SqrValue[PowerBlue]; // 查表 ImageData[Speed + 1] = SqrValue[PowerGreen]; ImageData[Speed + 2] = SqrValue[PowerRed]; Speed += 3; // 跳往下一个像素 SpeedOne += 3; } } Sw.Stop(); this.Text = "计算用时: " + Sw.ElapsedMilliseconds.ToString() + " ms"; Bmp.UnlockBits(BmpData); // 必须先解锁,否则Invalidate失败 } Pic.Invalidate(); }
为简单的起见,这里先是用的C#的一维数组实现的,并且计时部分未考虑图像数据的获取和更新, 因为真正的图像处理过程中图像数据肯定是已经获得的了。
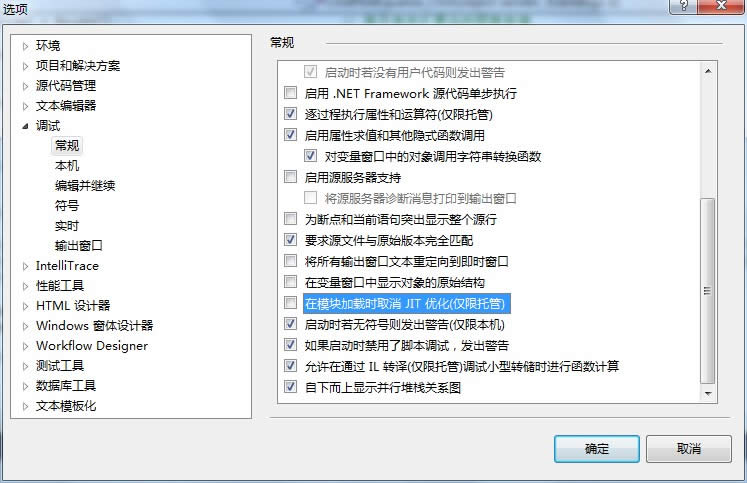
针对上述代码,编译为Release模式后,执行编译后的EXE,对于3000*4000*3的彩色图像,耗时约480ms,如果你是在IDE的模式先运行,记得一定要在选项--》调试--》常规里不勾选 在模块加载时取消JIT优化(仅限托管)一栏。

上述代码中的填充克隆图数据时并没有新建一副图,然后再填充其中的图像数据,而是直接填充一个数组,图像其实不就是一片连续内存加一点头信息吗,头信息已经有了,所以只要一片内存就够了。
克隆数据的填充采用了系统Buffer.BlockCopy函数,该函数类似于我们以前常用CopyMemory,速度非常快。
为进一步调高执行速度,我们首先来看看算法的关键耗时部位的代码,即for (X = 0; X < Width; X++)内部的代码,我们取一行代码的反编译码来看看:
BlueOne = ImageDataC[SpeedOne] + 2 * ImageDataC[SpeedTwo] + ImageDataC[SpeedThree] - ImageDataC[SpeedOne + 6] - 2 * ImageDataC[SpeedTwo + 6] - ImageDataC[SpeedThree + 6];
00000302 cmp ebx,edi 00000304 jae 0000073C // 数组是否越界? 0000030a movzx eax,byte ptr [esi+ebx+8] // 将ImageDataC[SpeedOne]中的数据传送的eax寄存器 0000030f mov dword ptr [ebp-80h],eax 00000312 mov edx,dword ptr [ebp-2Ch] 00000315 cmp edx,edi 00000317 jae 0000073C // 数组是否越界? 0000031d movzx edx,byte ptr [esi+edx+8] // 将ImageDataC[SpeedTwo]中的数据传送到edx寄存器00000322 add edx,edx // 计算2*ImageDataC[SpeedTwo] 00000324 add eax,edx // 计算ImageDataC[SpeedOne]+2*ImageDataC[SpeedTwo],并保存在eax寄存器中 00000326 cmp ecx,edi 00000328 jae 0000073C 0000032e movzx edx,byte ptr [esi+ecx+8] // 将ImageDataC[SpeedThree]中的数据传送到edx寄存器00000333 mov dword ptr [ebp+FFFFFF78h],edx 00000339 add eax,edx 0000033b lea edx,[ebx+6] 0000033e cmp edx,edi 00000340 jae 0000073C 00000346 movzx edx,byte ptr [esi+edx+8] 0000034b mov dword ptr [ebp+FFFFFF7Ch],edx 00000351 sub eax,edx 00000353 mov edx,dword ptr [ebp-2Ch] 00000356 add edx,6 00000359 cmp edx,edi 0000035b jae 0000073C 00000361 movzx edx,byte ptr [esi+edx+8] 00000366 add edx,edx 00000368 sub eax,edx 0000036a lea edx,[ecx+6] 0000036d cmp edx,edi 0000036f jae 0000073C 00000375 movzx edx,byte ptr [esi+edx+8] 0000037a mov dword ptr [ebp+FFFFFF74h],edx 00000380 sub eax,edx 00000382 mov dword ptr [ebp-30h],eax上述汇编码我只注释一点点,其中最0000073c 标号,我们跟踪后返现是调用了另外一个函数:
0000073c call 685172A4
我们看到在获取每一个数组元素前,都必须执行一个cmp 和 jae指令,从分析我认为这里是做类似于判断数组的下标是否越界之类的工作的。如果我们能确保我们的算法那不会产生越界,这部分代码有很用呢,不是耽误我做正事吗。
为此,我认为需要在C#中直接利用指针来实现算法,C#中有unsafe模式,也有指针,所以很方便,而且指针的表达即可以用*,也可以用[],比如*(P+4) 和P[4]是一个意思。那么只要做很少的修改就可以将上述代码修改为指针版。
private void CmdFindEdgesPointer_Click(object sender, EventArgs e) { int X, Y; int Width, Height, Stride, StrideC, HeightC; int Speed, SpeedOne, SpeedTwo, SpeedThree; int BlueOne, BlueTwo, GreenOne, GreenTwo, RedOne, RedTwo; int PowerRed, PowerGreen, PowerBlue; Bitmap Bmp = (Bitmap)Pic.Image; if (Bmp.PixelFormat != PixelFormat.Format24bppRgb) throw new Exception("不支持的图像格式."); byte[] SqrValue = new byte[65026]; for (Y = 0; Y < 65026; Y++) SqrValue[Y] = (byte)(255 - (int)Math.Sqrt(Y)); // 计算查找表,注意已经砸查找表里进行了反色 Width = Bmp.Width; Height = Bmp.Height; Stride = (int)((Bmp.Width * 3 + 3) & 0XFFFFFFFC); StrideC = (Width + 2) * 3; HeightC = Height + 2; // 宽度和高度都扩展2个像素 byte[] ImageData = new byte[Stride * Height]; // 用于保存图像数据,(处理前后的都为他) byte[] ImageDataC = new byte[StrideC * HeightC]; // 用于保存扩展后的图像数据 fixed (byte* P = &ImageData[0], CP = &ImageDataC[0], LP = &SqrValue[0]) { byte* DataP = P, DataCP = CP, LutP = LP; BitmapData BmpData = new BitmapData(); BmpData.Scan0 = (IntPtr)DataP; // 设置为字节数组的的第一个元素在内存中的地址 BmpData.Stride = Stride; Bmp.LockBits(new Rectangle(0, 0, Bmp.Width, Bmp.Height), ImageLockMode.ReadWrite关键词:PhotoShop算法原理解析系列 - 风格化-搜索边缘。